Activity and View
Any child of Activity class can be an entry point into the Android application. Activity represent a single window which is presented to the user to view or interact with the application such as viewing a list, clicking a button etc.
Activity uses View objects to show the visual components which the user can view or interact with. A View is the basic building block of the user interface. View is the top level parent and all the other widgets like Button, Checkbox etc are its children. ConstraintLayout is a child of ViewGroup which is in turn a child of View.
You will use the Activity's onCreate() method to initialize the user interface by calling the setContentView(View) method.
@Override
protected void onCreate(Bundle savedInstanceState) {
    super.onCreate(savedInstanceState);
    setContentView(R.layout.activity_main);
}
setContentView() method is associating the Activity with the layout xml file activity_main.xml under the layout folder. Now change the example by replacing setContentView statement with the following code snippet and run it on the Emulator:
package tutorial.android.mbcc.myapplication;

import android.app.Activity;
import android.os.Bundle;
import android.widget.TextView;

public class MainActivity extends Activity {

    @Override
    protected void onCreate(Bundle savedInstanceState) {
        super.onCreate(savedInstanceState);
        TextView textView = new TextView(this);
        textView.setText("Hello there!");
        setContentView(textView);

    }
}
Note
- Instead of selecting 'run' you can also select 'Apply Changes' button next to run. This can be used when there are only changes in method implementation or resources without changing the manifest or add any other components.
Once the changes are applied to your program, you will see 'Hello there!' displayed as shown below:
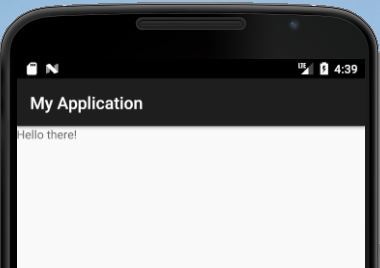
Congratulations! You just created the view of HelloWorld in two different ways:
- Defined the TextView in activity_main.xml file
- Dynamically created the TextView widget inside of the MainActivity java class and set that view using the setContentView method.
Layouts
Of course, you will need more than a single View to create a user interface. Views are arranged as a tree where each view can contain other child views. The ViewGroup (https://developer.android.com/reference/android/view/ViewGroup.html) is a subclass of View (https://developer.android.com/reference/android/view/View.html) and is used as a container to provide layout for child View controls. Some common ViewGroup descendants are:
- LinearLayout arranges child widgets in horizontal or vertical rows. This is achieved through ‘orientation’ attribute on the layout
- RelativeLayout arranges child widgets relative to each other or the parent.
- ConstraintLayout which is available in support library for API level 9 and above, arranges child widgets similar to RelativeLayout except it has additional attributes (ability to define constraints bias) which help in designing a layout which seamlessly adopt for different screen sizes. Also Android Studio makes it easier to design a constraint layout using the Layout Editor GUI tool. Refer: https://developer.android.com/training/constraint-layout
- FrameLayout blocks out an area on the screen to display a single item
- TableLayout arranges child widgets as rows and columns in a table.
The code example below shows a LinearLayout placing a TextView and a Button in a vertical arrangement. After the orientation is set, the background color is assigned a yellow color, a ten pixel padding is placed inside the layout container and the two views (text and button) are added to the LinearLayout. Then the entire LinearLayout is assigned as the content view of the Activity.
@Override
public void onCreate(Bundle savedInstanceState) {
        super.onCreate(savedInstanceState);
        TextView textView = new TextView(this);
        textView.setText("Hello Android!");
        Button button = new Button(this);
        button.setText("Click me!");
        LinearLayout layout = new LinearLayout(this, null);
        layout.setOrientation(LinearLayout.VERTICAL);
        layout.setBackgroundColor(Color.YELLOW);
        layout.setPadding(10, 10, 10, 10);
        layout.addView(textView);
        layout.addView(button);
        setContentView(layout);
}
Note
- You will need to import Button, LinearLayout and other classes into your program. You could use keyboard by first having your mouse cursor on the class you want to import and then pressing alt+enter. This will automatically import the classes you are interested in.
XML Layout
Creating layout objects in code may make more sense in special situations where the layout isn't known at design time. Instead, you can create your layout in XML where you'll gain clear advantages over creating the layout in code:
- Presentation and application logic are separated.
- You can express layout details more simply in XML markup.
- You can use IDE to help build the user interface interactively using Graphical User Interface.
- You can still access all the objects from the XML file in code.
The previous LinearLayout example can be expressed entirely in XML:
<?xml version="1.0" encoding="utf-8"?>
<LinearLayout xmlns:android="http://schemas.android.com/apk/res/android"
    android:layout_width="fill_parent"
    android:layout_height="fill_parent"
    android:background="#888888"
    android:orientation="vertical" >
    <TextView
        android:layout_width="wrap_content"
        android:layout_height="wrap_content"
        android:text="Hello Android!" >
    </TextView>
    <Button
        android:layout_width="wrap_content"
        android:layout_height="wrap_content"
        android:text="Click me!" >
    </Button>
</LinearLayout>
XML makes it easier to see that the TextView and Button are contained by the LinearLayout. Layout width and height properties that were set implicitly in code are defined explicitly in the XML version.
Loading XML Layout
The XML layout is stored as a resource and can be referenced through its resource id using this syntax: R.layout.
In the onCreate() of the MainActivity, use the setContentView() method overload that takes a resource id ‘activity_main’
@Override
protected void onCreate(Bundle savedInstanceState) {
    super.onCreate(savedInstanceState);
    setContentView(R.layout.activity_main);
}
Notice that setContentView() is called to include the widgets in the "activity_main.xml" layout resource. It's this step that implicitly "inflates" the XML to create all the views for the Activity. "Inflating" is simply the process that creates objects out of xml definitions that can be used at runtime.
Layout Properties
Layout properties determine how views are dimensioned, aligned and clipped in relation to their containers and each other.
Width and Height: layout_width and layout_height properties determine how a View fills the available space inside a parent object. You can set both of these properties to a specific pixel value, wrap_content or match_parent.
Wrap Content: wrap_content fills the dimension according to the content requirements. For example, if a Button has text "Submit", the button will be dimensioned to clearly view the text but will not completely fill the screen with the Button.
Match Parent: match_parent fills as much of the dimension as the parent container allows.
How Android draws views?
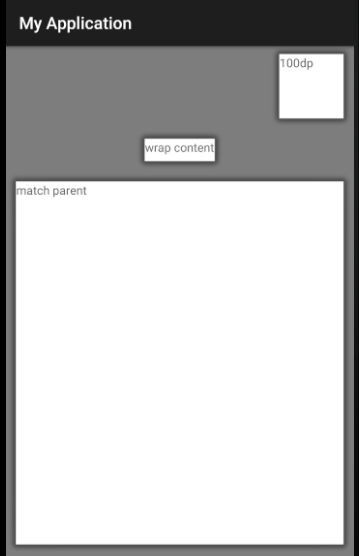
Activity provides the root node of its layout hierarchy to the Android framework which handles the drawing. Drawing begins with the root node of the layout. It is requested to measure and draw the layout tree. Drawing is handled by walking the tree and rendering each View. In turn, each ViewGroup is responsible for requesting each of its children to be drawn (with the draw() method) and each View is responsible for drawing itself. Because the tree is traversed in-order, this means that parents will be drawn before their children, with siblings drawn in the order they appear in the tree.
Consider the below example:
<?xml version="1.0" encoding="utf-8"?>
<LinearLayout xmlns:android="http://schemas.android.com/apk/res/android"
    android:layout_width="fill_parent"
    android:layout_height="fill_parent"
    android:background="#888888"
    android:orientation="vertical" >
    <TextView
        android:layout_width="100dp"
        android:layout_height="100dp"
        android:background="@android:drawable/alert_light_frame"
        android:layout_gravity="right"
        android:text="100dp" >
    </TextView>
    <TextView
        android:layout_width="wrap_content"
        android:layout_height="wrap_content"
        android:layout_gravity="center_horizontal"
        android:background="@android:drawable/alert_light_frame"
        android:text="wrap content" >
    </TextView>
    <TextView
        android:layout_width="match_parent"
        android:layout_height="match_parent"
        android:background="@android:drawable/alert_light_frame"
        android:text="match parent" >
    </TextView>
</LinearLayout>
Positioning View Contents To position the contents within the view, use the android:gravity attribute. You can use top, bottom, left, right, center, center_horizontal, center_vertical. Each of these values moves the view without changing the view's size.
Extra Space Allocation
android:layout_weight Indicates how much of the extra space in the layout will be allocated to the view associated with these LayoutParams. A value of "0" means that the view will not be allocated any of the extra space. If one view gets a android:layout_weight of "1" and a second view gets "2", then the second view will get twice the allocated space. To use android:layout_weight, set the dimension along where the relative measurements should go to "wrap_content".
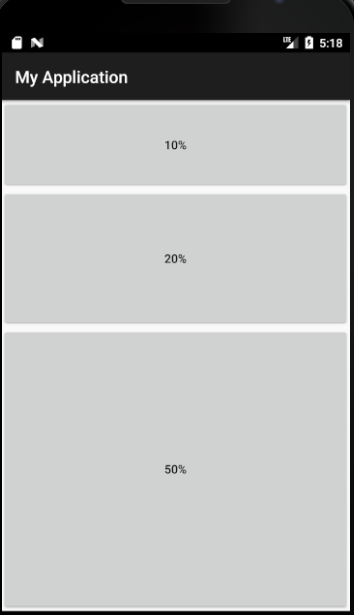
In the example below there are three buttons arranged vertically. The android: layout_height attribute for each is set to wrap_content. The android:layout_weight values are set to ".1", ".2" and ".5" respectively.
<LinearLayout xmlns:android="http://schemas.android.com/apk/res/android"
android:orientation="vertical" android:layout_width="match_parent"
android:layout_height="match_parent">
    <Button
   android:layout_width="match_parent"
   android:layout_height="wrap_content"
   android:text="10%"
   android:layout_weight="0.1" />
    <Button
   android:layout_width="match_parent"
   android:layout_height="wrap_content"
   android:text="20%"
   android:layout_weight="0.2" />
    <Button
   android:layout_width="match_parent"
   android:layout_height="wrap_content"
   android:text="50%"
   android:layout_weight="0.5" />
</LinearLayout>
The running example shows the appearance of the layout.
Changing background color of the views
To change the background color of any of the widgets like buttons, textview etc., it is a good idea to define your color in the colors.xml file in the 'values' folder and then use the defined color in the layout file. Here is an example;
<?xml version="1.0" encoding="utf-8"?>
<resources>
    <color name="colorPrimary">#008577</color>
    <color name="colorPrimaryDark">#00574B</color>
    <color name="blue">#0000ff</color>
    <color name="colorAccent">#D81B60</color>
</resources>
Notice that there are 4 colors defined using the html hex color codes for the color. Once defined, you can access those values in the layout file as shown below:
    <Button
   android:layout_width="match_parent"
   android:layout_height="wrap_content"
   android:text="20%"
   android:background="@color/blue"
   android:textColor="@android:color/white"
   android:layout_weight="0.2" />
In the above button definition for the layout, we have set background color to 'blue' that is defined in colors.xml and the textColor is set to white, this definition is coming from the Android api.
Note on Dimension
A dimension is specified with a number followed by a unit of measurement.
dp: Use ‘dp’ Density-independent Pixels - An abstract unit that is based on the physical density of the screen. For higher density screen the number of pixels used to draw 1dp scales up and vice-versa with a lower density. Using dp units (instead of px units) is a simple solution to making the view dimensions in your layout resize properly for different screen densities.
sp: Scale-independent Pixels - This is like the dp unit, but it is also scaled by the user's font size preference. It is recommend you use this unit when specifying font sizes.
Coding the User Interface
All the attribute definitions and widgets which are added in the xml file can also be manipulated inside Java code. This includes being able to access widgets, load XML layout and change the layout properties, in the code.
Once the XML layout has been loaded by the Activity, use the Activity findViewById() method to get the object reference. Pass the resource id of the object using the syntax "R.id.
setContentView(R.layout.main);
TextView textView01 = (TextView) findViewById(R.id.textView1);
textView01.setText("My new blue text");
textView01.setTextColor(Color.BLUE);
In the XML id tag "android:id="@+id/textView1", the "@" symbol tells the parser to expand the id string and identify it as an ID resource. The "+" symbol indicates that a new resource must be created and added to an auto-generated file called "R.java".
You can find this file in your project under build\generated\source\r folder.
If the object needs to appear in the XML layout file and do not need to be referenced in your Java code then omit android:id.
Else use @+id/widgetName as the id, where the widgetName represents your locally-unique name for the widget, for the first occurrence of a given id in your layout file.
<LinearLayout xmlns:android="http://schemas.android.com/apk/res/android"
android:orientation="vertical" android:layout_width="match_parent"
android:layout_height="match_parent">
    <Button
   android:layout_width="match_parent"
   android:layout_height="wrap_content"
   android:id="@+id/myWidget1"
   android:text="10%"
   android:layout_weight="0.1" />
    <Button
   android:layout_width="match_parent"
   android:layout_height="wrap_content"
   android:text="20%"
   android:layout_weight="0.2" />
    <Button
   android:layout_width="match_parent"
   android:layout_height="wrap_content"
   android:text="50%"
   android:layout_weight="0.5" />
</LinearLayout>
Notice id is added for the first button by adding android:id="@+id/myWidget1 in the xml definition. Now you can get reference of this button in your Activity by using findViewById method of the Activity class.
Button myWidget1 = findViewById(R.id.myWidget1);
Once you have the handle on the button, you can manipulate the properties of the button inside your Activity class.
How to handle layouts for difference screen sizes?
When you create and publish an Android app, by default your app can be downloaded by Android devices of all screen sizes unless you add restrictions. Refer: https://developer.android.com/guide/practices/screens-distribution.html#FilteringTabletApps
So a layout that you created by testing on your device will not look great in another Android device with a difference screen size. Although may get stretched or shrunk by the Android OS, it still is not the optimal placement for all widgets.
Android framework provides three ways of handling this:
- For simple layout you can use Constraint layout which when designed well will adjust the widgets and its spacing based on relative positioning. All the views can not only stretch but also move as the screen size changes.
- For more complex layouts, you can create one layout for each screen size by adding layouts in folders with size and orientation qualifiers
- For more complex applications, you can break the Activity into multiple Fragments and assemble different fragments for different layouts, on the fly based on screen sizes.
Refer to this link to understand more on these techniques: https://developer.android.com/training/multiscreen/screensizes
Common Widgets
View
All widgets extend View, and as such give all widgets an array of properties and methods.
http://developer.android.com/reference/android/view/View.html
Padding: Widgets have a minimum size, one that may be influenced by what is inside of them. E.g., a Button will expand to accommodate the size of its caption. You can control this size using padding. Adding padding will increase the space between the contents (e.g., the caption of a Button) and the edges of the widget.
In XML use:
android:padding: all four sides
android:paddingLeft: left padding etc.
From Java use setPadding() Dimensions: 5px is 5 pixels, 10dp is 10 density-independent pixels, or 2mm is 2 millimeters
Dimensions Android provides rich options for defining dimensions. Refer: http://developer.android.com/guide/topics/resources/more-resources.html#Dimension
ViewGroup
View class represents the basic building block for user interface components. All widgets extend View. ViewGroup is a child of View and all layout classes extend ViewGroup. ViewGroup is a wrapper View that can contain other views. LayoutParams are used by views to tell their parents how they want to be laid out.
Using one of the LayoutParams constructor overloads, you can define the layout_width and layout_height attributes. Use the setLayoutParams() method to assign the LayoutParams instance to a View.
Text View
The simplest widget is the label which is the TextView. Not editable directly by users.
To support internationalization, use a string resource reference defined in res/values/strings.xml file.
Common Attributes
android:textStyle: e.g., bold, italic etc
android:textColor: color code in hex format etc.
<?xml version="1.0" encoding="utf-8"?>
<TextView xmlns:android="http://schemas.android.com/apk/res/android"
android:layout_width="match_parent"
android:layout_height="wrap_content"
android:text="This is getting really easy!!"
/>
Now can you move the hard coded text in the above example to strings.xml file and get it to work again?
Button Button is a subclass of TextView. A button consists of text or an icon (or both text and an icon) that communicates what action occurs when the user touches it.

Example Declarations
A simple Text Button
<Button
    android:id="@+id/mybutton"
    android:layout_width="wrap_content"
    android:layout_height="wrap_content"
    android:text="@string/button_text"
    ... />


//An Image Button

<ImageButton
    android:layout_width="wrap_content"
    android:layout_height="wrap_content"
    android:src="@drawable/button_icon"
    ... />


//An Image and Text Button

<Button
    android:layout_width="wrap_content"
    android:layout_height="wrap_content"
    android:text="@string/button_text"
    android:drawableLeft="@drawable/button_icon"
    ... />
Buttons are useful only when you are able to click it and something happens when you click. When the user clicks on the button, a click event is fired. When an event is fired, the program should have a listener which takes action for that event. That is when something happens because of click. In Android, you add onClick attribute to the button in the xml which is configured to invoke a method that is defined in the xml. Let us see the syntax:
<Button
android:onClick="someMethod"
...
/>
Now add someMethod that is defined in the xml in your Activity class as defined below:
public void someMethod(View theButton) {
// do something useful here
}
Here is a full example of adding an onClick listener to the button. Can you get this working?
<?xml version="1.0" encoding="utf-8"?>
<LinearLayout xmlns:android="http://schemas.android.com/apk/res/android"
    android:orientation="vertical" android:layout_width="match_parent"
    android:layout_height="match_parent">
    <Button
        android:layout_width="match_parent"
        android:layout_height="wrap_content"
        android:text="Click me"
        android:onClick="clickActionMethod"
        android:id="@+id/myWidget1" />
    <TextView
        android:layout_width="match_parent"
        android:text="Hello"
        android:id="@+id/myTextView"
        android:layout_height="match_parent" />
</LinearLayout>
package tutorial.android.mbcc.myapplication;

import android.app.Activity;
import android.graphics.Color;
import android.os.Bundle;
import android.util.Log;
import android.view.View;
import android.widget.TextView;
import android.widget.Toast;


public class MainActivity extends Activity {

    @Override
    public void onCreate(Bundle savedInstanceState) {
        super.onCreate(savedInstanceState);
        setContentView(R.layout.activity_main);
    }

    public void clickActionMethod(View v){
        Log.d("MainActivity","button clicked");
        Toast.makeText(this, "Yay you clicked the button!", Toast.LENGTH_LONG).show();

        TextView textView = findViewById(R.id.myTextView);
        textView.setTextColor(Color.RED);
    }
}
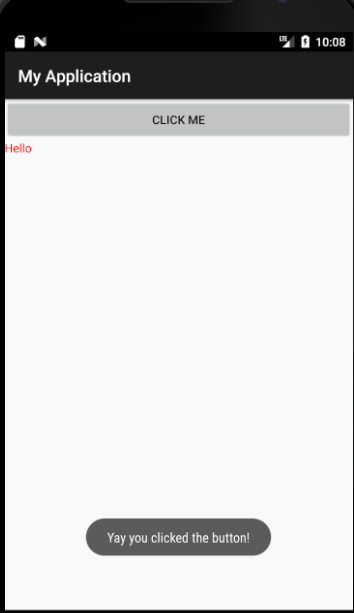
Points to note
- When you click on the button, clickActionMethod defined in the xml is invoked in the Activity class.
- The first statement in this method is a Log statement. Log is used to print messages on the console and used for debugging your program. Log messages can be viewed by clicking on 'LogCat' tab in the bottom pane of your Android Studio.
- The next statement creates a Toast and displays it.
- The next two statements changes the color of the text displayed on TextView. Note the way the reference to the Textview is retrieved using findViewById
There are several other widgets like RadioButton, CheckBox etc. and they all have their unique xml definitions and event Listeners specific to its functionality.
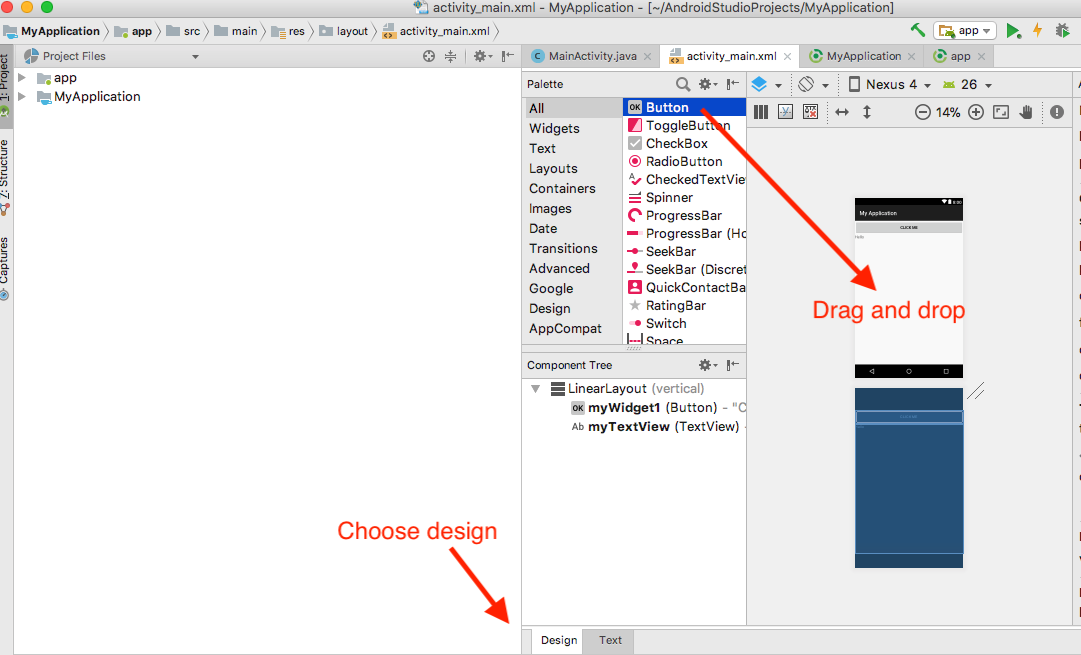
Dragging and dropping the widgets from the side pane to the layout file on your IDE will make adding these widgets to layouts much simpler. To use this feature, open your layout xml file and choose 'Design' tab instead of 'Text' tab for the file.
For specific event listeners refer to the each widgets documentation.
Reference: In this link look at the indirect subclasses to get an idea of all the children of TextView which are most commonly used http://developer.android.com/reference/android/widget/TextView.html
User Alerts
Toast
We use Toast to display simple feedback about an operation in a small popup which is dismissed after the specified small duration automatically. The general syntax is:
Context context = getApplicationContext();
CharSequence text = "Hello toast!";
int duration = Toast.LENGTH_SHORT;

Toast toast = Toast.makeText(context, text, duration);
toast.show();
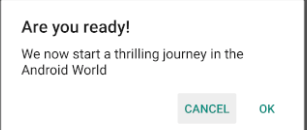
Alert Dialog An Alert Dialog is a small window that prompts the user to make a decision. This is the javascript alert equivalent. Here is an example
AlertDialog.Builder builder = new AlertDialog.Builder(this);
builder.setMessage("We now start a thrilling journey in the Android World")
               .setTitle("Are you ready!");

 // Add the buttons
 builder.setPositiveButton("OK", new DialogInterface.OnClickListener() {
            public void onClick(DialogInterface dialog, int whichbutton) {
                 Toast.makeText(MainActivity.this, "Fasten your seat belt!", Toast.LENGTH_LONG).show();
             }
 });
 builder.setNegativeButton("CANCEL", new DialogInterface.OnClickListener() {
            public void onClick(DialogInterface dialog, int whichbutton) {
                  Toast.makeText(MainActivity.this, "Too bad you missed a ton of fun!", Toast.LENGTH_LONG).show();
             }
});

AlertDialog dialog = builder.create();
dialog.show();
Here is the screenshot of the dialog that pops up
Can you now replace the toast with the Alert and see this in action yourself?
The above example uses an Anonymous Inner class construct for implementing the DialogInterface.OnClickListener.
Though AlertDialog is the most commonly used Dialog, Android does provide other flavors of Dialogs as well.
Reference: http://developer.android.com/guide/topics/ui/dialogs.html
Exercise Create a Math flash card app as follows:
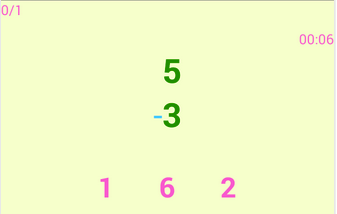
- User gets a total of 10 flash cards of single digit positive numbers for addition.
- Show a counter for displaying total flash card shown with total current attempts.
- Show a chronometer to display the time elapsed.
- After 10 flash cards are displayed, show an alert with the score and a choice for quitting the game or starting a new game.
- Numbers should be random and the answer buttons are also randomly positioned.
- No two answer buttons should have the same value.