File Reading and Writing
Any enterprise level Java application will have some functionality with respect to reading and writing to file system. Remember even getting a file stream from the Internet is also considered a file.
Java API provides a large group of classes for these functionalities. Reference: https://docs.oracle.com/javase/9/docs/api/java/io/package-tree.html It is important to note that reading from a file are through classes that have Input or Reader in their name and to write to a file, you use the classes that have Output or Writer in them.
There are two main hierarchies that you should get familiar with; Stream hierarchy and Reader hierarchy. Let us understand them in detail
Stream hierarchy
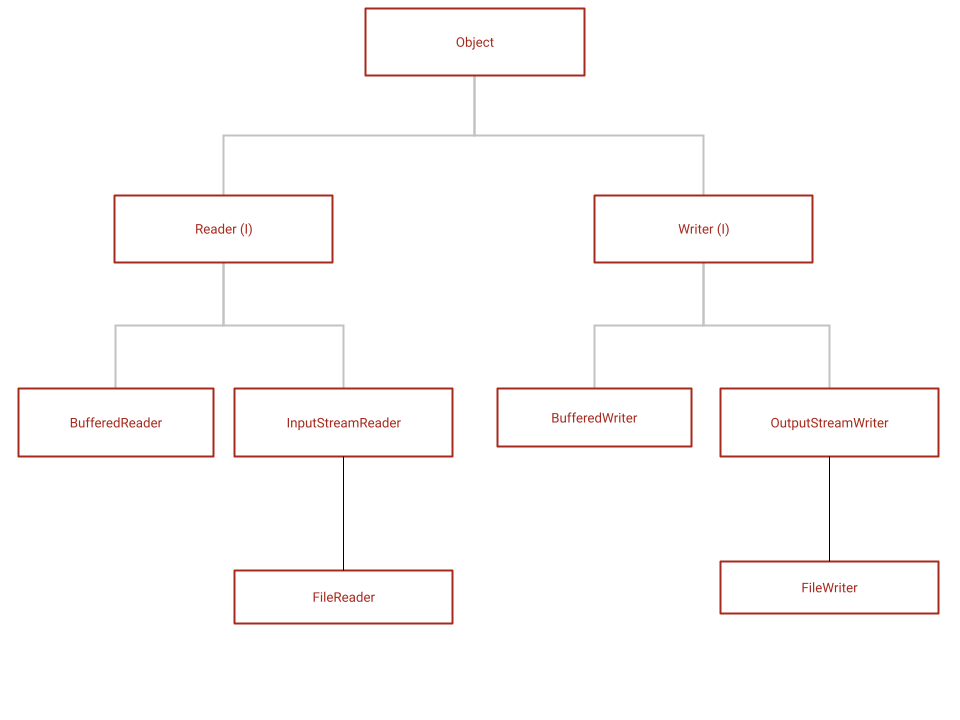
The below diagram shows the popular classes that belong to Stream hierarchy

Stream hierarchy works for all types of files, but for textual files, it is better to use the Reader hierarchy shown below even though you could still use this API. If the file is not textual, then this API is the only way to read and write files.
Let us take an example of reading and writing a binary file like an image;
package com.mbcc.tutorial.file;

import java.io.FileInputStream;
import java.io.FileOutputStream;
import java.io.IOException;
import java.io.InputStream;
import java.io.OutputStream;

public class StreamExample {
    public static void main(String[] args) {
        InputStream inputStream = null;
        OutputStream outputStream = null;

        try {
            inputStream = new FileInputStream("/Users/jayashree/mbcc_logo2.png");
            outputStream = new FileOutputStream("/Users/jayashree/copiedImage.png");

            int byteRead;

            while ((byteRead = inputStream.read()) != -1) {
                outputStream.write(byteRead);
            }

        } catch (IOException ex) {
            ex.printStackTrace();
        } finally {
            try {
                inputStream.close();
                outputStream.close();
            } catch (IOException e) {
                e.printStackTrace();
            }

        }
    }
}
Points to Note
- If the file or folder is not present, it throws a FileNotFoundException
- Most file operations should be surrounded by try-catch or should throw IOException as IOException is a checked exception
- If try-with-resources-clause is not used, then the opened streams should be closed, preferably in the finally clause.
- File path shown in for Unix/Linux/MacOS systems. For Windows you typically start with the Drive name like C: and followed by two backslash's, for e.g., C:\Users\jayashree\mbcc_logo.png
try-with-resources clause
The try-with-resources statement is a try statement that declares one or more resources as try parameters. A resource is an object that must be closed after the program is finished with it and a file is nothing but a resource. The try-with-resources statement ensures that each resource is closed at the end of the statement and you do not have to explicitly close the resource like in the last example, in the finally clause. Any object that implements java.lang.AutoCloseable, which includes all objects which implement java.io.Closeable, can be used as a resource and all types of file classes come under this category.
Here is the revised program which implements the exact same functionality but is more optimized by using try-with-resources clause in the try statement. And notice that you do not need to close the file or have the finally block in this implementation. The resources are automatically closed by the API, once the try block is exited.
package com.mbcc.tutorial.file;

import java.io.FileInputStream;
import java.io.FileOutputStream;
import java.io.IOException;
import java.io.InputStream;
import java.io.OutputStream;

public class StreamExample {
    public static void main(String[] args) {

        try (InputStream inputStream = new FileInputStream("/Users/jayashree/mbcc_logo.png");
                OutputStream outputStream = new FileOutputStream("/Users/jayashree/copiedImage.png");) {

            int byteRead;

            while ((byteRead = inputStream.read()) != -1) {
                outputStream.write(byteRead);
            }

        } catch (IOException ex) {
            ex.printStackTrace();
        }
    }
}
Refer: https://docs.oracle.com/javase/tutorial/essential/exceptions/tryResourceClose.html
Using Buffered Streams
While the above program does the job of reading and writing files to the file stream, it is not very efficient as for every write and read of the byte, it accesses the file system which is not performant. Instead you can encapsulate the underlying streams inside a BufferedStreams as shown in the below example. In case of Buffered streams, there is a temporary buffer to which you read and/or write. When the buffer gets full, it writes to the file system. In case of read, the stream is read upto the size of the buffer in one go and then for every API call on read, it gets the value from the buffer only when the buffer is exhausted, it reaches out to the filesytem file to refill the buffer.
Here is an example which has the same functionality but using a BufferedStream:
package com.mbcc.tutorial.file;

import java.io.BufferedInputStream;
import java.io.BufferedOutputStream;
import java.io.FileInputStream;
import java.io.FileOutputStream;
import java.io.IOException;

public class StreamExample {
    public static void main(String[] args) {

        try (BufferedInputStream inputStream = new BufferedInputStream(
                new FileInputStream("/Users/jayashree/mbcc_logo.png"));
                BufferedOutputStream outputStream = new BufferedOutputStream(
                        new FileOutputStream("/Users/jayashree/copiedImage.png"));) {

            int byteRead;

            while ((byteRead = inputStream.read()) != -1) {
                outputStream.write(byteRead);
            }


        } catch (IOException ex) {
            ex.printStackTrace();
        }
    }
}
Notice how the original streamis given as a constructor argument for the Buffered streams
Reader hierarchy
Java FileWriter and FileReader classes are used to write and read data from textual files. Even though you could have used the stream hierarchy classes, it is recommended to use this for textual data as these classes are optimized for text context.
Using FileWriter
To write to a file, you use the FileWriter.
package com.mbcc.tutorial.file;

import java.io.FileWriter;
import java.io.IOException;

public class FileReadWriteExample {
    public static void main(String[] args) {

        String str = "File Reader and Writer API's are pretty simple";
        // attach a file to FileWriter
        try (FileWriter fw = new FileWriter("/Users/jayashree/outputFile.txt");) {
            fw.write(str);
        } catch (IOException e) {
            e.printStackTrace();
        }
    }
}
The above example create a file and names it 'outputFile.txt' in /Users/jayashree folder. Please note if there is no such directory, it will throw an FileNotFouncException. Although it will create a file it is not present, it will not create a directory.
Points to Note
- In the above example, if there is a file already present, that file will be overwritten.
- To append to an existing file, use the other constructor FileWriter(File file, boolean append) and set the boolean value to true.
- Calling close() on the stream flushes the stream and closes it.
- Reading and writing take place character by character, thereby increasing the number of I/O operations which degrades the performance. BufferedWriter can be used along with FileWriter to improve speed of execution. Here is the same example wiht BufferedWriter
package com.mbcc.tutorial.file;

import java.io.BufferedWriter;
import java.io.FileWriter;
import java.io.IOException;

public class FileReadWriteExample {
    public static void main(String[] args) {

        String str = "File Reader and Writer API's are pretty simple";
        // attach a file to FileWriter
        try (BufferedWriter bw = new BufferedWriter(new FileWriter("/Users/jayashree/outputFile.txt"));){
            bw.write(str);
        } catch (IOException e) {
            e.printStackTrace();
        }
    }
}
The same example can be improved further by using the try-with-resources clause
package com.mbcc.tutorial.file;

import java.io.BufferedWriter;
import java.io.FileWriter;
import java.io.IOException;

public class FileReadWriteExample {
    public static void main(String[] args) {

        String str = "File Reader and Writer API's are pretty simple";
        try (BufferedWriter bw = new BufferedWriter(new FileWriter("/Users/jayashree/outputFile.txt"));) {
            bw.write(str);
        } catch (IOException e) {
            e.printStackTrace();
        }
    }
}
Using FileReader
To read from a File, you use the FileReader. Just like in the writer, you can use BufferedReader for optimizations. You can also use try-with-resources clause.
Here is the example to that enhances the functionality from the previous example to read the file that was written
package com.mbcc.tutorial.file;

import java.io.BufferedReader;
import java.io.BufferedWriter;
import java.io.FileReader;
import java.io.FileWriter;
import java.io.IOException;

public class FileReadWriteExample {
    public static void main(String[] args) {

        String strWrite = "File Reader and Writer API's are pretty simple";
        try (BufferedWriter bw = new BufferedWriter(new FileWriter("/Users/jayashree/outputFile.txt"));) {
            bw.write(strWrite);
        } catch (IOException e) {
            e.printStackTrace();
        }

        String strRead = null;
        try (BufferedReader bw = new BufferedReader(new FileReader("/Users/jayashree/outputFile.txt"));) {
            strRead = bw.readLine();
            System.out.println(strRead);
        } catch (IOException e) {
            e.printStackTrace();
        }

    }
}