Activity Lifecycle
Activity instances in your app transition between different states as the user navigates in and out of the app on their devices. The diagram below shows the various callback methods invoked and the order in which they are invoked:
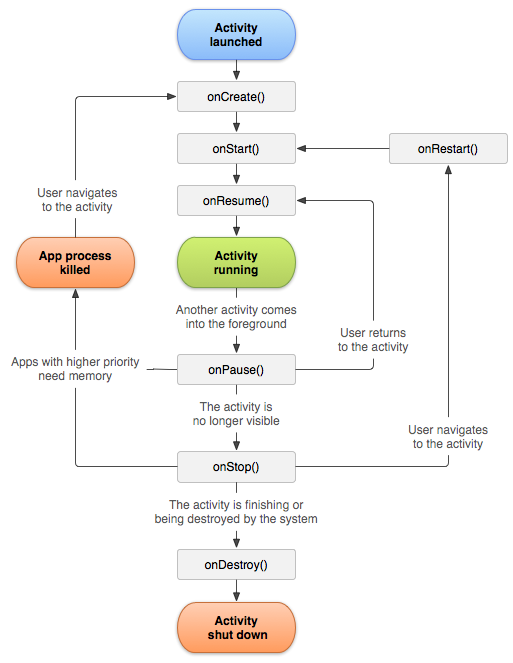
Reference: http://developer.android.com/reference/android/app/Activity.html
Saving State: When your activity is recreated after it was previously destroyed by OS, you can recover your saved state from the Bundle that the system passes to your activity. Both the onCreate() and onRestoreInstanceState() callback methods receive the same Bundle that contains the instance state information which was saved in onSaveInstanceState() method
onSaveInstanceState() is called just before onStop() and onRestoreInstanceState() is called just after onStart();
Note: Bundle will be null in onCreate() method if there is no saved instance state. If the bundle is null then onRestoreInstanceState() is never called. If the user hits the back button or if your program calls finish() then no instance state is saved.
Example of saving instance state
@Override
public void onSaveInstanceState(Bundle savedInstanceState) {
    // Save the user's current game state
    savedInstanceState.putInt(STATE_SCORE, mCurrentScore);
    savedInstanceState.putInt(STATE_LEVEL, mCurrentLevel);

    // Always call the superclass so it can save the view hierarchy state
    super.onSaveInstanceState(savedInstanceState);
}
Example of a restore in onCreate() method
@Override
protected void onCreate(Bundle savedInstanceState) {
    super.onCreate(savedInstanceState); // Always call the superclass first

    // Check whether we're recreating a previously destroyed instance
    if (savedInstanceState != null) {
        // Restore value of members from saved state
        mCurrentScore = savedInstanceState.getInt(STATE_SCORE);
        mCurrentLevel = savedInstanceState.getInt(STATE_LEVEL);
    } else {
        // Probably initialize members with default values for a new instance
    }
    ...
}
Example of a restore in onRestoreInstanceState() method
public void onRestoreInstanceState(Bundle savedInstanceState) {
    // Always call the superclass so it can restore the view hierarchy
    super.onRestoreInstanceState(savedInstanceState);

    // Restore state members from saved instance
    mCurrentScore = savedInstanceState.getInt(STATE_SCORE);
    mCurrentLevel = savedInstanceState.getInt(STATE_LEVEL);
}
Reference: http://developer.android.com/training/basics/activity-lifecycle/recreating.html
Tasks and Back Stack
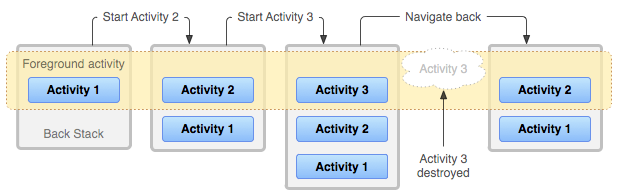
Reference:http://developer.android.com/guide/components/tasks-and-back-stack.html
Exercise
The app that was created in the previous chapter restarts the game when the user flips from Portrait to Landscape orientation. Enhance your Math App to ensure that the game state ( total correct answers, total cards and time elapsed) is saved when the user flips the phone from Portrait to Landscape and vice-versa.
Intents
Intents are a powerful feature of the Android platform that connect components together through messages. An Intent is the glue which connects the different components together. Intent, as the name suggests, represents an intent or action that needs to be performed on a particular Component. Intents are of two types:
- Explicit Intent: If you specify the target component in your intent, Android has no doubt where the intent is supposed to be routed to – it will launch the named activity. This routing approach is referred to as explicit routing.
Intent intent = new Intent(this, SecondActivity.class);
startActivity(intent);
In the above example we intend to invoke the SecondActivity.class explicitly. This is an example of Explicit Intent.
- Implicit Intent: If you do not specify the target component, then Android has to find out what components are registered to receive the intent. This routing approach is referred to as implicit routing.
Implicit intents let Android choose the class or application component that best satisfies the user's request and preferences. When you invoke one application from another it is mostly Implicit intent which is used as applications written by companies/programmers will not know the exact Activity name that needs to be invoked on a program written by someone else.
Implicit intent building blocks
The two most important pieces of an Implicit intent are the ‘Action’ and the ‘data’.
Intent intent = new Intent();
intent.setAction(Intent.ACTION_VIEW);
intent.setData(ContactsContract.Contacts.CONTENT_URI);
startActivity(intent);
In the above example any Activity which has registered itself with Action ‘ACTION_VIEW’ and which supports Data of type CONTENT_URI will be selected by the system and presented to the requesting program. How a component registers itself with specific criteria is detailed in Intent Filters below.
Contact List application which are available in all devices has registered itself for the criteria shown in the example so when you invoke with the above example code, Contact List application opens up.
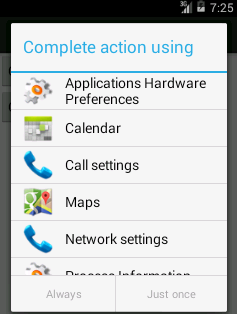
If more than one component satisfies the Intent, a list of choices will display, allowing the user to decide how best to handle the request. For example, if the data is an image, the list might include the Gallery and Camera applications.
Actions are constants, such as ACTION_VIEW (to bring up a viewer for the resource), ACTION_EDIT (to edit the resource), or ACTION_PICK (to choose an available item given a Uri representing a collection, such as content://contacts/people).
Some examples of Action/Data pairs are:
- ACTION_VIEW content://contacts/people/1 -- Display information about the person whose identifier is "1".
- ACTION_DIAL content://contacts/people/1 -- Display the phone dialer with the telephone number of the person with identifier ‘1’.
- ACTION_CALL content://contacts/people/1 -- Call the person with identifier 1. ( needs the permission to CALL to be specified. Add
to your AndroidManifest.xml file which enables the app to receive permissions from the user.) - ACTION_VIEW tel:123 -- Display the phone dialer with the given number filled in. Note how the VIEW action does what is considered the most reasonable thing for a particular URI ( does not need a URI to be specified to work )
- ACTION_DIAL tel:123 -- Display the phone dialer with the given number filled in (does not need a URI to be specified to work)
Rules for Implicit Routing
Three rules, all of which must be true for a given activity to be eligible for a given intent:
- The activity must support the specified action.
- The activity must support the stated MIME type (if supplied)
- The activity must support all of the categories named in the intent.
So you want to make your intents specific enough to find the right receiver(s).
Intent Filters
Stating Your Intent(ions): All Android components that wish to be notified via intents must declare intent filters, so Android knows which intents should go to that component. To do this, you need to add intent-filter elements to your AndroidManifest.xml file.
<application>
    <activity android:label="Now" android:name=".Now">
        <intent-filter>
            //Is the main activity for this application. More actions are allowed
            <action android:name="android.intent.action.MAIN" />
            // gets an icon because it is a launcher
            <category android:name="android.intent.category.LAUNCHER" />
        </intent-filter>
    </activity>
</application>
Other filter criteria
category: Main activity will be in the LAUNCHER category. Others would be DEFAULT or ALTERNATIVE categories.
component: Specifies an explicit name of a component class (full class path with package declaration) to use for the intent. Normally this is determined by looking at the other information in the intent (the action, data/type, and categories) and matching that with a component that can handle it. If this attribute is set then none of the evaluation is performed, and this component is used exactly as is. By specifying this attribute, all of the other Intent attributes become optional
extras: Along with Action and Data, an Intent can also use "Extra" information. The Intent Extras property is a Bundle type, a collection of objects to be passed between processes. The Intent putExtra() has numerous overloads that let you place any number of types into the bundle before starting the activity.
Intent intent = new Intent();
intent.putExtra("finalScore", “10/10”);
intent.putExtra("totalTime", 20);
In the called activity, the string that is set can be retrieved with the method this.getIntent().getStringExtra(“finalScore”) and you use getIntExtra(“totalTime”) to get the integer value.
Start Another Activity
Simple approach to start another activity is to create an Intent and call startActivity method by passing the created Intent in it.
Example
Intent intent = new Intent(this, SecondActivity.class);
startActivity(intent);
SecondActivity is another activity inside the same application and should be declared in the AndroidManifest.xml file and only then it can be invoked with the same statement. Syntax for adding the second activity inside the manifest file:
<activity
        android:name="com.example.intentexamples.SecondActivity"
           android:label="@string/app_name" >

</activity>
Failing to include the
Note there is no Intent-filter declaration in the above example, hence this activity can be invoked by Explicit Intent only. To make this activity be found through an Implicit Intent, Intent-filter declaration as shown below is required.
<activity android:name="com.example.intentexamples.SecondActivity" android:label="@string/app_name" >
    <intent-filter>
        <action android:name="android.intent.action.CALL" />
        <category android:name="android.intent.category.DEFAULT" />
        <data android:scheme="tel" />
    </intent-filter>
</activity>
Now SecondActivity will get selected whenever an Intent is created with the Action and/or Data as specified in the Intent-filter matches.
Exercise Enhance your MathApp to add another activity which replaces the AlertDialog with a Game Over Screen

startActivityForResult
So far you learnt how to call another activity or application using intents. In the previous examples, the request to invoke another application or activity was from the caller activity to the called activity. But there is no way the called activity can communicate back to the caller activity with any information. To get this feature of returning information back to the caller activity, invoke the other activity using startActivityForResult() method and then implement onActivityResult() method in the caller activity. Similar to startActivity() method, pass the Intent object as the first parameter. The second parameter is a requestCode which is any identifier to indicate the caller activity.
startActivityForResult(intent, requestCode);
The onActivityResult() method passes an integer requestCode as the second parameter of startActivityForResult().
The resultCode is an integer used in the called activity, that maps to the Activity constant RESULT_OK by default but can be set to any value. Once you've checked that the activity did not fail and that the activity was called with a particular requestCode, you can process the activity's results. You can call the getExtras() method of the Intent passed to this event handler to get the results. Please note bundle will have values only if it was set with values in the setResult method of the called Activity.
Here is an example
import android.app.Activity;
import android.content.Intent;
import android.os.Bundle;
import android.view.View;
import android.widget.Toast;

// the requester (caller) activity
public class MainActivity extends Activity {

    public static int REQUEST_CODE = 3;

    @Override
    protected void onCreate(Bundle savedInstanceState) {
        super.onCreate(savedInstanceState);
        setContentView(R.layout.activity_main);
    }

    public void invokeSecondActivity(View v){
        Intent intent = new Intent(this,SecondActivity.class);
        startActivityForResult(intent, REQUEST_CODE);
    }

    @Override
    protected void onActivityResult(int requestCode, int resultCode, Intent data) {
        super.onActivityResult(requestCode, resultCode, data);

        if(resultCode == SecondActivity.RESULT_CODE && requestCode == REQUEST_CODE) {
            Toast.makeText(this, "requestCode=" + requestCode + ", \nresultCode=" + resultCode, Toast.LENGTH_LONG).show();
            System.out.println(data.getStringExtra("myname"));
        }
    }
}

// the requested (called ) activity
import android.app.Activity;
import android.content.Intent;
import android.os.Bundle;

public class SecondActivity extends Activity {

    public static int RESULT_CODE = 102;

    @Override
    protected void onCreate(Bundle savedInstanceState) {
        super.onCreate(savedInstanceState);
        setContentView(R.layout.activity_second);

        Intent returnIntent = new Intent();
        returnIntent.putExtra("myname", "Mobi Bootcamp Student!");

        setResult(RESULT_CODE,returnIntent);
    }
}
Notice when the Toast in the caller activity is displayed when the called activity is invoked and returns a message through setResult method back to the caller activity.
Some common examples of Implicit Intent invocation
1. Opening contacts
Intent intent = new Intent();
intent.setAction(Intent.ACTION_VIEW);
intent.setData(ContactsContract.Contacts.CONTENT_URI);
startActivity(intent);
If more than one component satisfies the Intent, a list of choices will display, allowing the user to decide how best to handle the data. For example, if the Data is removed then more applications satisfy the specified Intent.
Intent intent = new Intent();
intent.setAction(Intent.ACTION_VIEW);
startActivity(intent);
2. Open the Telephone Dial Pad with a number populated
Uri uri = Uri.parse("tel:12312345");
Intent intent = new Intent(Intent.ACTION_DIAL, uri);
startActivity(intent);
3. Music playback
Intent intent = new Intent("com.android.music.PLAYBACK_VIEWER");
  startActivity(intent);
}
4. For opening a Browser
Uri uri = Uri.parse("http://www.mobibootcamp.com");
Intent intent = new Intent(Intent.ACTION_VIEW, uri);
startActivity(intent);
Connecting to the internet also requires you to add the android.permission.INTERNET permission to the manifest.
<?xml version="1.0" encoding="utf-8"?>
<manifest ... >
    <uses-permission android:name="android.permission.INTERNET"/>
    ...
</manifest>
Points to note
- In Android development, you never use the new keyword to instantiate the Activity or any other component. You instantiate an Intent and the Android system will instantiate the Activity or any other main component based on your Intent request.
- Use Instance variables to hold the state of the Android component.
Exercise
Now that you have the basic idea of how to use intents, can you capture the image from your camera following the instructions on this page? https://developer.android.com/training/camera/photobasics.html