You learnt Java until now because, one of the official languages for creating Android programs is Java and the other one is Kotlin. Hurray! Now you can create Android programs which can run on your Android device!
Download Android Studio from this link:https://developer.android.com/studio and then follow the instructions below.
Android Project
Create a basic Android project by leaving most of the default's alone, except for changing the package name as shown in the video:
Points to note!
- Although you could leave the package name to the default 'com.example' for your very first project, you will need to change it if you plan on publishing your app on Google Play. Every app should have a unique package name when you publish your app and com.example is not accepted.
- The ‘Save location’ setting is where the project is physically stored on your computer.
- Each version of the Android API has a ‘Level’ number. Each API level will have its own capabilities, behavior and user interface collectively called API features.
- The minimum API level that you choose determines the lowest API level that your app can be downloaded to. This is mainly meant for applications which are distributed through Google Play. If you are not distributing your app for consumers to download, then the minimum API level that you choose is based on your specific needs of your application.
- If you choose a lower API then more devices can be download your app. The total coverage number for the minimum API is a dynamic number which changes based on Google's API management across all devices in the world.
- As soon as you create a project and also when ever you make any changes, gradle kicks in and starts building your project. You will see the gradle status in the bottom pane of your IDE. Always wait till it finishes all its compilation before you conclude your code is not compiling.
Selecting an API Version for Google Play
Lower levels of the minimum API will be supported by more devices, while higher levels will be able to handle more advanced functionality. With that in mind you should configure the emulator to use the lowest level API that has all the features that your application must support.
Note: Testing on your real device is both easy and fast. So you will mostly deploy your app on your device. You can plug your phone into your computer via the USB cable and run your applications following similar steps as shown below for deploying to an AVD. If a device is connected, it will show up along with the AVD's that you created. An advantage of this approach is that it is likely to run more quickly. Depending upon your device you may need to download the driver for your phone from the manufacturer’s Website.
Refer Android Developer site if required: https://developer.android.com/studio/run/device.html
Android Virtual Devices (AVD)
While it is best to use your own device, there are instances when you need an Emulator. Supposing you want to test on a device which you do not have? Then an Emulator comes handy as you can create an Emulator simulating a plethora of hardware devices and also on all varieties of Android SDK. AVD's are nothing but simulations of mobile devices running on a Java program. You can set up an AVD to run a particular version of the Android API, set the screen resolution and add hardware capabilities such as Accelerometer, Camera or Battery support.
Detailed instructions are on this page to setup an AVD: https://developer.android.com/studio/run/emulator.html
However AndroidStudio also makes it seamless to create an AVD and deploy your app.
Once your project is created, you can deploy your HelloWorld project by selecting the green arrow next to app as shown below:
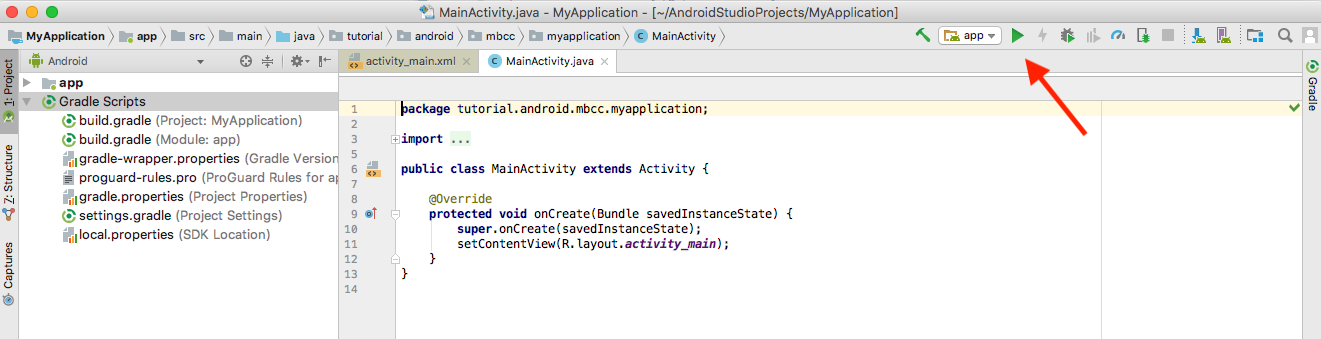
Once you choose the green arrow, IDE will guide you through selecting the emulator. Since we chose API level 24, you have to choose the corresponding emulator device which supports API 24. Note, IDE will help you download the respective emulators and/or API libraries if you choose an emulator and API which are not already installed on your IDE.
You will be able to run the emulator supplied with the Android SDK to mimic the behavior of any supported API version.
Deleting your Android Project
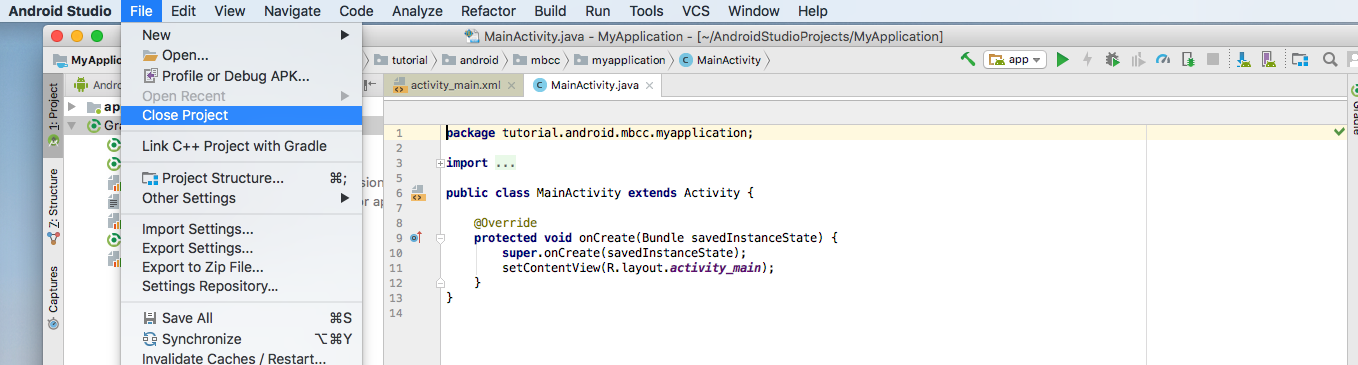
There will be instances when you want to delete your project. For this you first have to close your project from Android studio by choosing File-->close
Once the project is closed it brings you to the Android Studio's welcome screen. From here select the 'x' mark to remove it from Android Studio's memory. However note that the files are not really deleted from the filesystem in this step. The project is not longer remembered by Android Studio.
To finally get rid of you files, you have to open your File Explorer or any program of your choice and manually delete the folder which contains your Android project files.
In this example, the files were created in ~/AndroidStudioProjects/MyApplication. So you could open a terminal by clicking on the 'Terminal' tab present in the lower pane of your Android Studio and run
cd ..
The above command takes you one folder behind the current folder. The current folder would be inside your MyApplication. To check that it is really MyApplication folder you could run
pwd
before running cd ..
and to remove the folder, run remove command with 'r' for recursive and 'f' for force; basically means recursively remove all the files from 'MyApplication' folder.
rm -rf MyApplication*
After this step your project is fully removed from your computer. Be careful before you run this step though.
Alternatively you could used any of the File Explorer to accomplish the same task.
Projects and Files
When you created the project, the Android Studio automatically created the necessary files in various folders for the 'Hello World' app. Now you will understand some of the key files and folders which make up an Android project. Android Studio provides many project structures based the selected types, namely Project, Packages, Android etc. To understand the basic files we will open the 'Android' view.
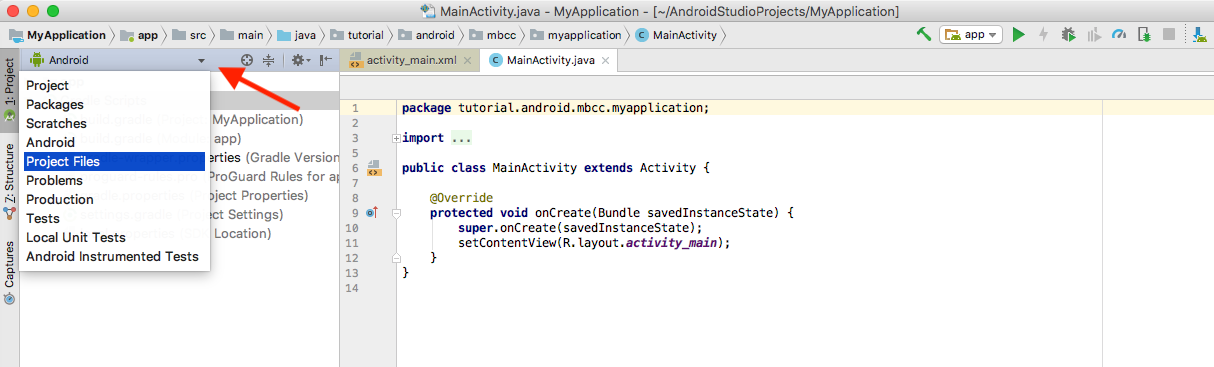 Select Android from the dropdown and the files are classified as follows:
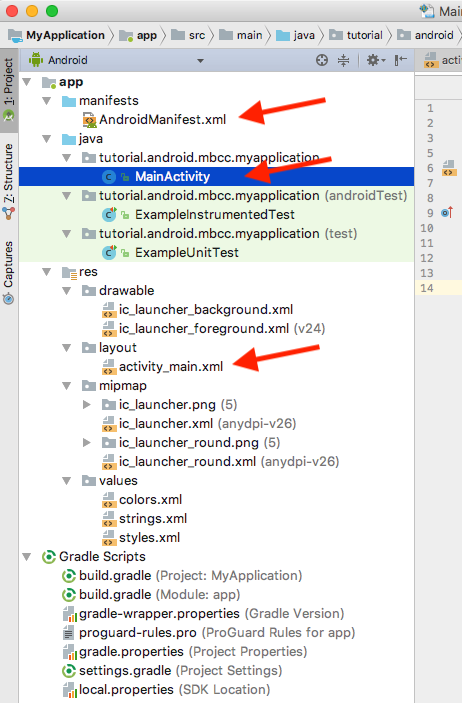
Files in HelloWorld
AndroidManifest.xml is the configuration file for the entire application. All the components that make up the complete application are listed out in this file along with user permission definitions and a host of other configuration details. activity_main.xml is the layout resource file that defines the user interface. This file is located under res/layout *MainActivity.java contains the code for the initial view of the application. This file is located under java folder.
The actual file system file location is not displayed in this view. To see the complete folders in which these files are placed, choose 'Project Files' in the top drop down menu instead of 'Android' and you will see the full path of each file. 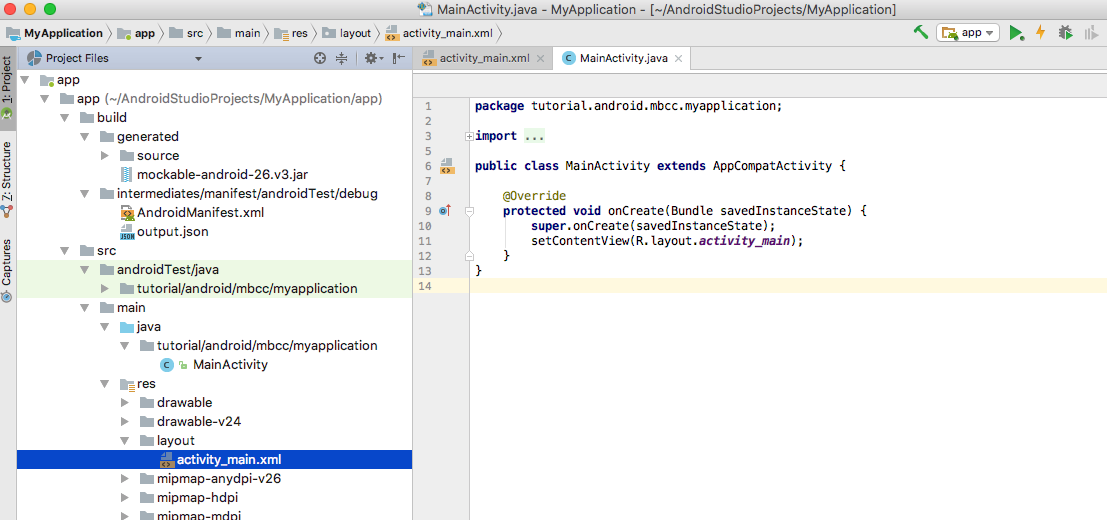
Layout Resource File
The XML files under the "layout" folder are used to structure the user interface and to keep those details separate from the code. In "activity_main.xml", listed below, there is a ConstraintLayout container.
<?xml version="1.0" encoding="utf-8"?>
<android.support.constraint.ConstraintLayout xmlns:android="http://schemas.android.com/apk/res/android"
    xmlns:app="http://schemas.android.com/apk/res-auto"
    xmlns:tools="http://schemas.android.com/tools"
    android:layout_width="match_parent"
    android:layout_height="match_parent"
    tools:context="tutorial.android.mbcc.myapplication.MainActivity">

    <TextView
        android:layout_width="wrap_content"
        android:layout_height="wrap_content"
        android:text="Hello World!"
        app:layout_constraintBottom_toBottomOf="parent"
        app:layout_constraintLeft_toLeftOf="parent"
        app:layout_constraintRight_toRightOf="parent"
        app:layout_constraintTop_toTopOf="parent" />

</android.support.constraint.ConstraintLayout>
Activity Class File
The "MainActivity.java" class, under src folder, is a child class of Activity. You can think of each Activity as a single window which is opened by the system and presented to the user to view/interact with the program such as viewing a list, clicking a button etc. When the Activity is created, the XML layouts are loaded and made visible.
package tutorial.android.mbcc.myapplication;

import android.app.Activity;
import android.os.Bundle;

public class MainActivity extends Activity {

    @Override
    protected void onCreate(Bundle savedInstanceState) {
        super.onCreate(savedInstanceState);
        setContentView(R.layout.activity_main);
    }
}
AndroidManifest File
The top part of the "AndroidManifest.xml" file defines the package that the application is contained in. The manifest also lists all the components of an application which includes the activities that the application can perform and the classes the application uses to perform these activities. In the listing below there's a single "MainActivity" activity.
Inside the activity, an intent-filter element describes the kinds of actions this activity is ready to perform. Inside the filter, Android Studio has added an action element called "android.intent.action.MAIN" that lets Android know that it should use this Activity to start the application when the user invokes the app from the home screen. Although this listing has only one Activity, a typical Android application will have many activities and only one Activity will be marked with the intent-filter action of Main.
The manifest can get quite complex in a large application and can also include listing of other components, permissions used to perform certain activities, target platform software and hardware requirements etc..
<?xml version="1.0" encoding="utf-8"?>
<manifest xmlns:android="http://schemas.android.com/apk/res/android"
    package="tutorial.android.mbcc.myapplication">

    <application
        android:allowBackup="true"
        android:icon="@mipmap/ic_launcher"
        android:label="@string/app_name"
        android:roundIcon="@mipmap/ic_launcher_round"
        android:supportsRtl="true"
        android:theme="@style/AppTheme">
        <activity android:name=".MainActivity">
            <intent-filter>
                <action android:name="android.intent.action.MAIN" />

                <category android:name="android.intent.category.LAUNCHER" />
            </intent-filter>
        </activity>
    </application>

</manifest>
References
- Are you wondering what are all the other files and folders meant for? Here is the reference doc with full details: https://developer.android.com/guide/topics/resources/providing-resources.html Although you will be learning some details in small bites in the coming chapters, it is still a good idea to have a cursory glance at the file structure.